Internet of Things
Introduction
You can easily connect BeagleBone Black to the Internet via a wire (<networking_wired>), wirelessly (<networking_wireless>), or through the USB to a host and then to the Internet (<networking_usb>). Either way, it opens up a world of possibilities for the “Internet of Things” (IoT).
Now that you’re online, this chapter offers various things to do with your connection.
Accessing Your Host Computer’s Files on the Bone
Problem
You want to access a file on a Linux host computer that’s attached to the Bone.
Solution
If you are running Linux on a host computer attached to BeagleBone Black, it’s not hard to mount the Bone’s files on the host or the host’s files on the Bone by using +sshfs+. Suppose that you want to access files on the host from the Bone. First, install +sshfs+:
bone$ sudo apt install sshfs
Now, mount the files to an empty directory (substitute your username on the host computer for +username+ and the IP address of the host for +192.168.7.1+):
bone$ mkdir host
bone$ sshfs username@$192.168.7.1:. host
bone$ cd host
bone$ ls
The +ls+ command will now list the files in your home directory on your host computer. You can edit them as if they were local to the Bone. You can access all the files by substituting +:/+ for the +:.+ following the IP address.
You can go the other way, too. Suppose that you are on your Linux host computer and want to access files on your Bone. Install +sshfs+:
host$ sudo apt install sshfs
and then access:
host$ mkdir /mnt/bone
host$ sshfs debian@$192.168.7.2:/ /mnt/bone
host$ cd /mnt/bone
host$ ls
Here, we are accessing the files on the Bone as +debian+. We’ve mounted the entire file system, starting with +/+, so you can access any file. Of course, with great power comes great responsibility, so be careful.
Discussion
The +sshfs+ command gives you easy access from one computer to another. When you are done, you can unmount the files by using the following commands:
host$ umount /mnt/bone
bone$ umount home
Serving Web Pages from the Bone
Problem
You want to use BeagleBone Black as a web server.
Solution
BeagleBone Black already has the +nginx+ web server running.
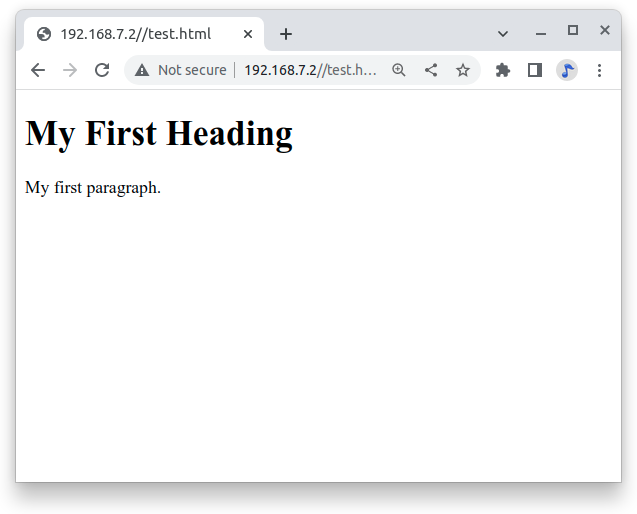
When you point your browser to _192.168.7.2_, you are using the +nginx+ web server. The web pages are served from _/var/www/html/. Add the HTML in <networking_index_html> to a file called _/var/www/html/test.html_, and then point your browser to _192.168.7.2://test.html_.
A sample web page (test.html)
include::code/test.html[Sample html]
You will see the web page shown in <networking_node_page>.
test.html as served by nginx
Discussion
Interacting with the Bone via a Web Browser
Problem
BeagleBone Black is interacting with the physical world nicely and you want to display that information on a web browser.
Solution
https://www.fullstackpython.com/flask.html[Flask] is a Python web framework built with a small core and easy-to-extend philosophy. <networking_builtin_server> shows how to use nginx, the web server that’s already running. This recipe shows how easy it is to build your own server. This is an adaptation of Python WebServer With Flask and Raspberry Pi.
First, install flask:
bone$ sudo apt update
bone$ sudo apt install python3-flask
All the code in is the Cookbook repo:
bone$ git clone https://github.com/MarkAYoder/BoneCookbook
bone$ cd BoneCookbook/doc/06iod/code/flash
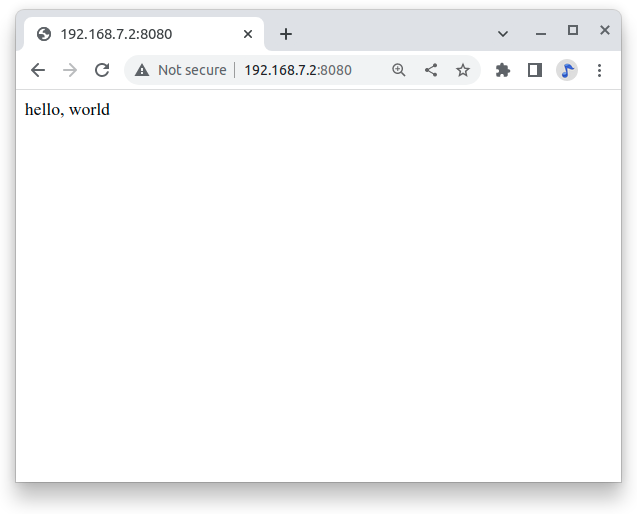
First Flask - hello, world
Our first example is helloWorld.py
Python code for flask hello world (helloWorld.py)
include::code/flask/helloWorld.py[simple flask-based web server]
<1> The first line loads the Flask module into your Python script.
<2> The second line creates a Flask object called _app_.
<3> The third line is where the action is, it says to run the index() function when someone accesses the root URL (‘/’) of the server. In this case, send the text “hello, world” to the client’s web browser via return.
<4> The last line says to “listen” on port 8080, reporting any errors.
Now on your host computer, browse to 192.168.7.2:8080flask an you should see.
Test page served by our custom flask server
Adding a template
Let’s improve our “hello, world” application, by using an HTML template and a CSS file for styling our page. Note: these have been created for you in the “templates” sub-folder. So, we will create a file named index1.html, that has been saved in /templates.
Here’s what’s in templates/index1.html:
Python code for flask hello world (helloWorld.py)
include::code/flask/templates/index1.html
Note: a style sheet (style.css) is also included. This will be populated later.
Observe that anything in double curly braces within the HTML template is interpreted as a variable that would be passed to it from the Python script via the render_template function. Now, let’s create a new Python script. We will name it app1.py:
Python code for flask index1.html (app1.py)
include::code/flask/app1.py[app1]
Note that we create a formatted string(“timeString”) using the date and time from the “now” object, that has the current time stored on it.
Next important thing on the above code, is that we created a dictionary of variables (a set of keys, such as the title that is associated with values, such as HELLO!) to pass into the template. On “return”, we will return the index.html template to the web browser using the variables in the templateData dictionary.
Execute the Python script:
bone$ .\app.py
Open any web browser and browse to 192.168.7.2:8080. You should see:
Test page served by app1.py
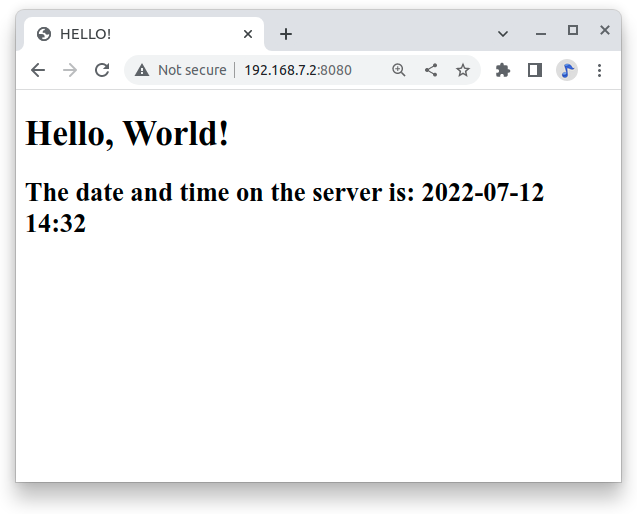
Note that the page’s content changes dynamically any time that you refresh it with the actual variable data passed by Python script. In our case, “title” is a fixed value, but “time” change it every second.
Displaying GPIO Status in a Web Browser - reading a button
Problem
You want a web page to display the status of a GPIO pin.
Solution
This solution builds on the Flask-based web server solution in <networking_nodejs>.
To make this recipe, you will need:
Breadboard and jumper wires (see <app_proto>)
Pushbutton switch (see <app_misc>)
Wire your pushbutton as shown in <js_pushbutton_fig>.
Wire a button to P9_11 and have the web page display the value of the button.
Let’s use a new Python script named app2.py.
A simple Flask-based web server to read a GPIO (app2.py)
include::code/flask/app2.py
Look that what we are doing is defining the button on P9_11 as input, reading its value and storing it in buttonSts. Inside the function index(), we will pass that value to our web page through “button” that is part of our variable dictionary: templateData.
Let’s also see the new index2.html to show the GPIO status:
A simple Flask-based web server to read a GPIO (index2.html)
include::code/flask/templates/index2.html[]
Now, run the following command:
bone$ ./app2.py
Point your browser to _http://192.168.7.2:8080_, and the page will look like <networking_GPIOserver_fig>.
Status of a GPIO pin on a web page
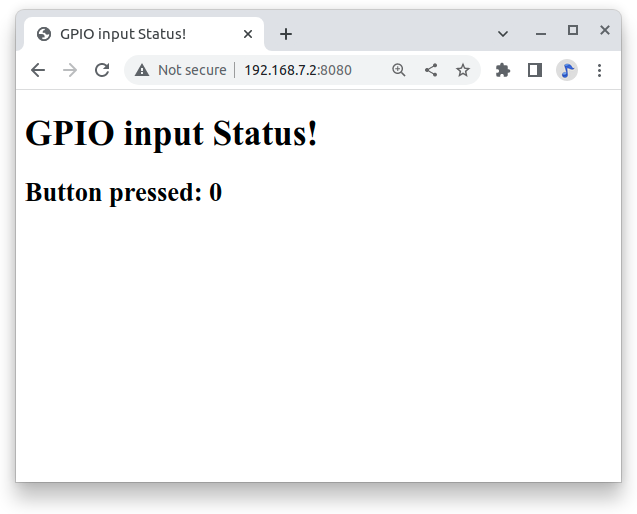
Currently, the +0+ shows that the button isn’t pressed. Try refreshing the page while pushing the button, and you will see +1+ displayed.
Discussion
It’s not hard to assemble your own HTML with the GPIO data. It’s an easy extension to write a program to display the status of all the GPIO pins.
Controlling GPIOs
Problem
You want to control an LED attached to a GPIO pin.
Solution
Now that we know how to “read” GPIO Status, let’s change them. What we will do will control the LED via the web page. We have an LED connected to P9_14. Controlling remotely we will change its status from LOW to HIGH and vice-versa.
The python script Let’s create a new Python script and named it app3.py.
A simple Flask-based web server to read a GPIO (app3.py)
include::code/flask/app3.py
What we have new on above code is the new “route”:
@app.route(“/<deviceName>/<action>”)
From the webpage, calls will be generated with the format:
http://192.168.7.2:8081/ledRed/on
or
http://192.168.7.2:8081/ledRed/off
For the above example, ledRed is the “deviceName” and on or off are examples of possible “action”. Those routes will be identified and properly “worked”. The main steps are:
Convert the string “ledRED”, for example, on its equivalent GPIO pin.
The integer variable ledRed is equivalent to P9_14. We store this value on variable “actuator”
For each actuator, we will analyze the “action”, or “command” and act properly.
If “action = on” for example, we must use the command: GPIO.output(actuator, GPIO.HIGH)
Update the status of each actuator
Update the variable library
Return the data to index.html
Let’s now create an index.html to show the GPIO status of each actuator and more important, create “buttons” to send the commands:
A simple Flask-based web server to write a GPIO (index3.html)
include::code/flask/templates/index3.html
bone$ ./app3.py
Point your browser as before and you will see:
Status of a GPIO pin on a web page
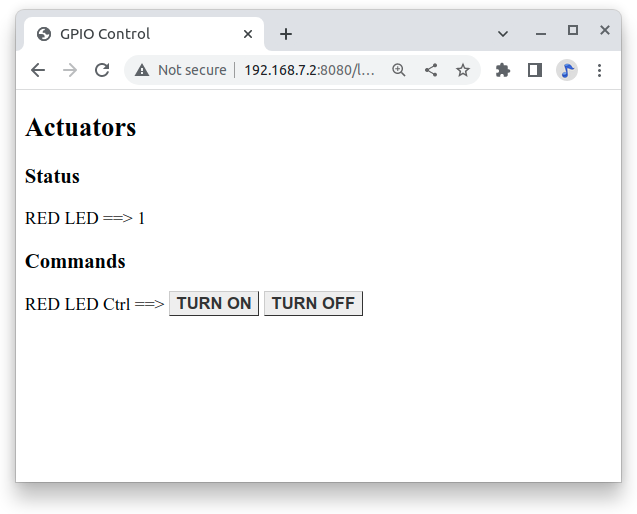
Try clicking the “TURN ON” and “TURN OFF” buttons and your LED will respond.
app4.py and app5.py combine the previous apps. Try them out.
Plotting Data
Problem
You have live, continuous, data coming into your Bone via one of the Analog Ins, and you want to plot it.
Solution
Analog in - Continuous (This is based on information at: http://software-dl.ti.com/processor-sdk-linux/esd/docs/latest/linux/Foundational_Components/Kernel/Kernel_Drivers/ADC.html#Continuous%20Mode)
Reading a continuous analog signal requires some set up. First go to the iio devices directory.
bone$ cd /sys/bus/iio/devices/iio:device0
bone$ ls -F
buffer/  in_voltage0_raw  in_voltage2_raw  in_voltage4_raw  in_voltage6_raw  name      power/          subsystem@
dev      in_voltage1_raw  in_voltage3_raw  in_voltage5_raw  in_voltage7_raw  of_node@  scan_elements/  uevent
Here you see the files used to read the one shot values. Look in +scan_elements+ to see how to enable continuous input.
bone$ ls scan_elements
in_voltage0_en     in_voltage1_index  in_voltage2_type   in_voltage4_en     in_voltage5_index  in_voltage6_type
in_voltage0_index  in_voltage1_type   in_voltage3_en     in_voltage4_index  in_voltage5_type   in_voltage7_en
in_voltage0_type   in_voltage2_en     in_voltage3_index  in_voltage4_type   in_voltage6_en     in_voltage7_index
in_voltage1_en     in_voltage2_index  in_voltage3_type   in_voltage5_en     in_voltage6_index  in_voltage7_type
Here you see three values for each analog input, _en (enable), _index (index of this channel in the buffer’s chunks) and _type (How the ADC stores its data). (See the link above for details.) Let’s use the input at P9.40 which is AIN1. To enable this input:
bone$ echo 1 > scan_elements/in_voltage1_en
Next set the buffer size.
bone$ ls buffer
data_available  enable  length  watermark
Let’s use a 512 sample buffer. You might need to experiment with this.
bone$ echo 512 > buffer/length

Then start it running.
bone$ echo 1 > buffer/enable

Now, just read from +/dev/iio:device0+.
1KHz sine wave sampled at 8KHz
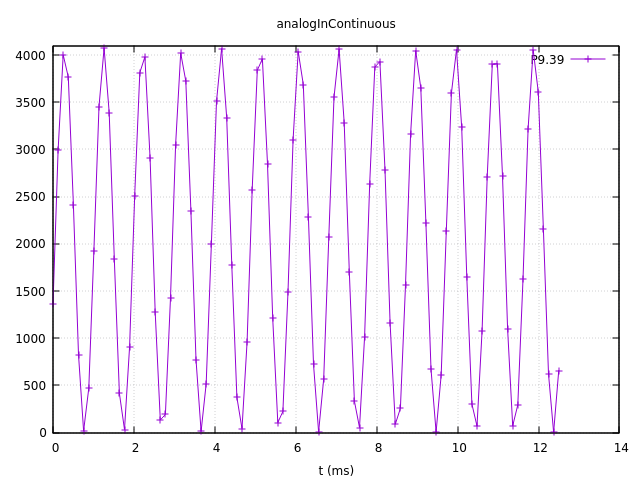
An example Python program that does the above and the reads and plot the buffer is here: analogInContinuous.py
Code to read and plot a continuous analog input(analogInContinuous.py)
include::code/analogInContinuous.py[]
Be sure to read the instillation instructions in the comments. Also note this uses X windows and you need to +ssh -X 192.168.7.2+ for X to know where the display is.
Run it:
host$ ssh -X bone

bone$ cd <Cookbook repo>/doc/06iot/code>/strong>
bone$ ./analogInContinuous.py
Hit ^C to stop
// TODO verify this works. fonts are taking too long to load
<analog_sine_fig> is the output of a 1KHz sine wave.
It’s a good idea to disable the buffer when done.
bone$ echo 0 > /sys/bus/iio/devices/iio:device0/buffer/enable
Analog in - Continuous, Change the sample rate
The built in ADCs sample at 8k samples/second by default. They can run as fast as 200k samples/second by editing a device tree.
bone$ cd /opt/source/bb.org-overlays
bone$ make
This will take a while the first time as it compiles all the device trees.
bone$ vi src/arm/src/arm/BB-ADC-00A0.dts
Around line 57 you’ll see
Line    Code
57     // For each step, number of adc clock cycles to wait between setting up muxes and sampling.
58     //  range: 0 .. 262143
59     //  optional, default is 152 (XXX but why?!)
60     ti,chan-step-opendelay = <152 152 152 152 152 152 152 152>;
61     //`
62     // XXX is there any purpose to set this nonzero other than to fine-tune the sample rate?
63
64
65     // For each step, how many times it should sample to average.
66     //  range: 1 .. 16, must be power of two (i.e. 1, 2, 4, 8, or 16)
67     //  optional, default is 16
68     ti,chan-step-avg = <16 16 16 16 16 16 16 16>;
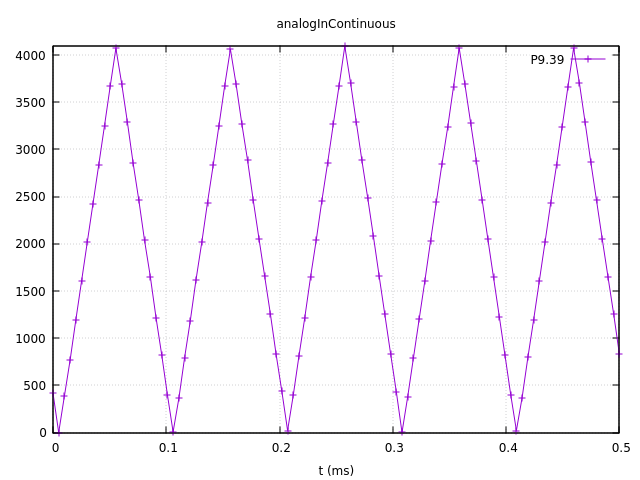
The comments give lots of details on how to adjust the device tree to change the sample rate. Line 68 says for every sample returned, average 16 values. This will give you a cleaner signal, but if you want to go fast, change the 16’s to 1’s. Line 60 says to delay 152 cycles between each sample. Set this to 0 to got as fast a possible.
ti,chan-step-avg = <1 1 1 1 1 1 1 1>;
ti,chan-step-opendelay = <0x00 0x00 0x00 0x00 0x00 0x00 0x00 0x00>;
Now compile it.
bone$ make
  DTC     src/arm/BB-ADC-00A0.dtbo
gcc -o config-pin ./tools/pmunts_muntsos/config-pin.c
It knows to only recompile the file you just edited. Now install and reboot.
bone$ sudo make install
...
'src/arm/AM335X-PRU-UIO-00A0.dtbo' -> '/lib/firmware/AM335X-PRU-UIO-00A0.dtbo'
'src/arm/BB-ADC-00A0.dtbo' -> '/lib/firmware/BB-ADC-00A0.dtbo'
'src/arm/BB-BBBMINI-00A0.dtbo' -> '/lib/firmware/BB-BBBMINI-00A0.dtbo'
...
bone$ reboot
A number of files get installed, including the ADC file. Now try rerunning.
bone$ cd <Cookbook repo>/docs/06iot/code>
bone$ ./analogInContinuous.py
Hit ^C to stop
Here’s the output of a 10KHz sine wave.
// TODO Is this trun: (The plot is wrong, but eLinux won’t let me fix it.)
10KHz triangle wave sampled at 200KHz
It’s still a good idea to disable the buffer when done.
bone$ echo 0 > /sys/bus/iio/devices/iio:device0/buffer/enable
Sending an Email
Problem
You want to send an email via Gmail from the Bone.
Solution
This example came from https://realpython.com/python-send-email/. First, you need to set up a Gmail account, if you don’t already have one. Then add the code in <networking_nodemailer_code> to a file named _emailTest.py_. Substitute your own Gmail username. For the password:
Select App password.
Generate your own 16 char password and copy it into _emailTest.py_.
Be sure to delete password when done https://myaccount.google.com/apppasswords .
Sending email using nodemailer (emailtTest.py)
include::code/emailTest.py
Then run the script to send the email:
bone$ chmod +x emailTest.py
bone$ .\emailTest.py
Warning
This solution requires your Gmail password to be in plain text in a file, which is a security problem. Make sure you know who has access to your Bone. Also, if you remove the microSD card, make sure you know who has access to it. Anyone with your microSD card can read your Gmail password.
Discussion
Be careful about putting this into a loop. Gmail presently limits you to 500 emails per day and 10 MB per message.
See https://realpython.com/python-send-email/ for an example that sends an attached file.
Sending an SMS Message
// TODO My twilio account is suspended.
Problem
You want to send a text message from BeagleBone Black.
Solution
There are a number of SMS services out there. This recipe uses Twilio because you can use it for free, but you will need to http://bit.ly/1MrHBBF[verify the number] to which you are texting. First, go to https://www.twilio.com/[Twilio’s home page] and set up an account. Note your account SID and authorization token. If you are using the free version, be sure to http://bit.ly/19c7GZ7[verify your numbers].
Next, install Trilio by using the following command:
bone$ npm install -g twilio
Finally, add the code in <networking_twilio_code> to a file named _twilio-test.js_ and run it. Your text will be sent.
Sending SMS messages using Twilio (_twilio-test.js_)
include::code/twilio-test.js[nodemailer-test.js]
Discussion
Twilio allows a small number of free text messages, enough to test your code and to play around some.
Displaying the Current Weather Conditions
Problem
You want to display the current weather conditions.
Solution
Because your Bone is on the network, it’s not hard to access the current weather conditions from a weather API.
Go to https://openweathermap.org/ and create an account.
Go to https://home.openweathermap.org/api_keys and get your API key.
Store your key in the +bash+ variable +APPID+.
bash$ export APPID="Your key"
Then add the code in <networking_weather_code> to a file named _weather.js_.
Run the pyhon script.
Code for getting current weather conditions (_weather.py_)
include::code/weather.py
<1> Prints current conditions. <2> Prints the forecast for the next day. <3> Prints everything returned by the weather site.
Run this by using the following commands:
bone$ chmod +x weather.py
bone$ ./weather.js
Getting weather
Temp:  85.1
Humid: 50
Low:   62.02
High:  85.1
sunrise: 2022-07-14 14:32:46
Discussion
The weather API returns lots of information. Use Python to extract the information you want.
Sending and Receiving Tweets
Problem
You want to send and receive tweets (Twitter posts) with your Bone.
Solution
Twitter has a whole git repo of sample code for interacting with Twitter. Here I’ll show how to create a tweet and then how to delete it.
Creating a Project and App
Follow the https://developer.twitter.com/en/docs/apps/overview[directions here] to create a project and and app.
Be sure to giv eyour app Read and Write permission.
Then go to the https://developer.twitter.com/en/portal/projects-and-apps[developer portal] and select you app by clicking on the gear icon to the right of the app name.
Click on the Keys and tokens tab. Here you can get to all your keys and tokens.
Tip
Be sure to record them, you can’t get them later.
Open the file +twitterKeys.sh+ and record your keys in it.
export API_KEY='XXX'
export API_SECRET_KEY='XXX'
export BEARER_TOKEN='XXX'
export TOKEN='4XXX'
export TOKEN_SECRET='XXX'
Next, source the file so the values will appear in your bash session.
bash$ source twitterKeys.sh
You’ll need to do this every time you open a new +bash+ window.
Creating a tweet
Add the code in <twitter_create_code> to a file called _twitter_create_tweet_.py_ and run it to see your timeline.
Create a Tweet (_twitter_create_tweet.py_)
include::code/twitter_create_tweet.py[]
Run the code and you’ll have to authorize.
bash$ ./twitter_create_tweet.py
Got OAuth token: tWBldQAAAAAAWBJgAAABggJt7qg
Please go here and authorize: https://api.twitter.com/oauth/authorize?oauth_token=tWBldQAAAAAAWBJgAAABggJt7qg
Paste the PIN here: 4859044
Response code: 201
{
    "data": {
        "id": "1547963178700533760",
        "text": "Hello world!"
    }
}
Check your twitter account and you’ll see the new tweet. Record the id number and we’ll use it next to delete the tweet.
Deleting a tweet
Use the code in <twitter_delete_code> to delete a tweet. Around line 15 is the id number. Paste in the value returned above.
.Code to delete a tweet (twitter_delete_tweet.py_)
include::code/twitter_delete_tweet.py
// TODO Start Here The code in <networking_pushbutton_code> sends a tweet whenever a button is pushed.
.Tweet when a button is pushed (twitterPushbutton.js)
include::code/twitterPushbutton.js
To see many other examples, go to iStrategyLabs’ node-twitter GitHub page.
Discussion
This opens up many new possibilities. You can read a temperature sensor and tweet its value whenever it changes, or you can turn on an LED whenever a certain hashtag is used. What are you going to tweet?
Wiring the IoT with Node-RED
Problem
You want BeagleBone to interact with the Internet, but you want to program it graphically.
Solution
http://nodered.org/[Node-RED] is a visual tool for wiring the IoT. It makes it easy to turn on a light when a certain hashtag is tweeted, or spin a motor if the forecast is for hot weather.
Installing Node-RED
To install Node-RED, run the following commands:
bone$ cd          # Change to home directory
bone$ git clone https://github.com/node-red/node-red.git
bone$ cd node-red/
bone$ npm install --production    # almost 6 minutes
bone$ cd nodes
bone$ git clone https://github.com/node-red/node-red-nodes.git # 2 seconds
bone$ cd ~/node-red
To run Node-RED, use the following commands:
bone$ cd ~/node-red
bone$ node red.js
Welcome to Node-RED
18 Aug 16:31:43 - [red] Version: 0.8.1.git
18 Aug 16:31:43 - [red] Loading palette nodes
18 Aug 16:31:49 - [26-rawserial.js] Info : only really needed for Windows boxes without serialport npm module installed.
18 Aug 16:31:56 - ——————————————
18 Aug 16:31:56 - [red] Failed to register 44 node types
18 Aug 16:31:56 - [red] Run with -v for details
18 Aug 16:31:56 - ——————————————
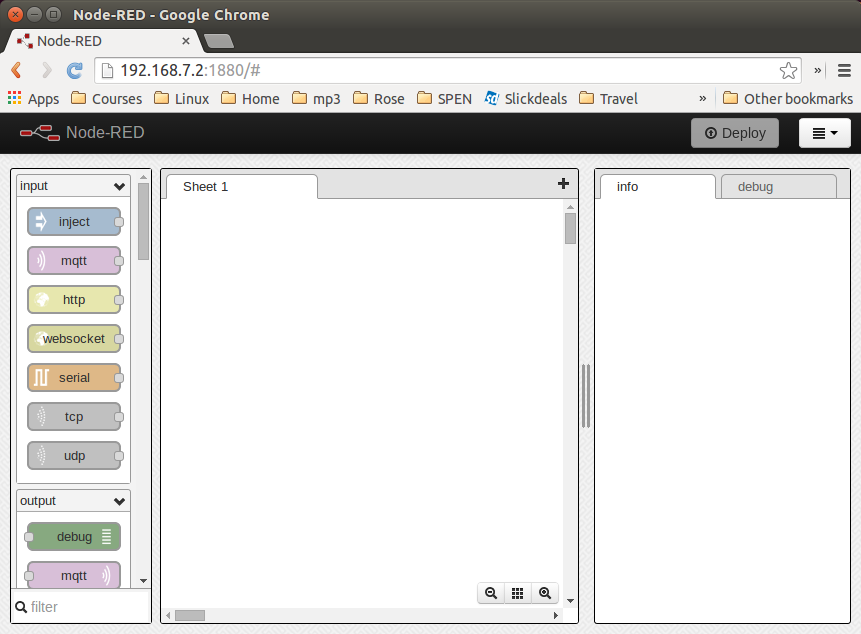
18 Aug 16:31:56 - [red] Server now running at http://127.0.0.1:1880/
18 Aug 16:31:56 - [red] Loading flows : flows_yoder-debian-bone.json
The second-to-last line informs you that Node-RED is listening on part +1880+. Point your browser to http://192.168.7.2:1880, and you will see the screen shown in <networking_node_red_fig>.
The Node-RED web page
Building a Node-RED Flow
The example in this recipe builds a Node-RED flow that will toggle an LED whenever a certain hashtag is tweeted. But first, you need to set up the Node-RED flow with the +twitter+ node:
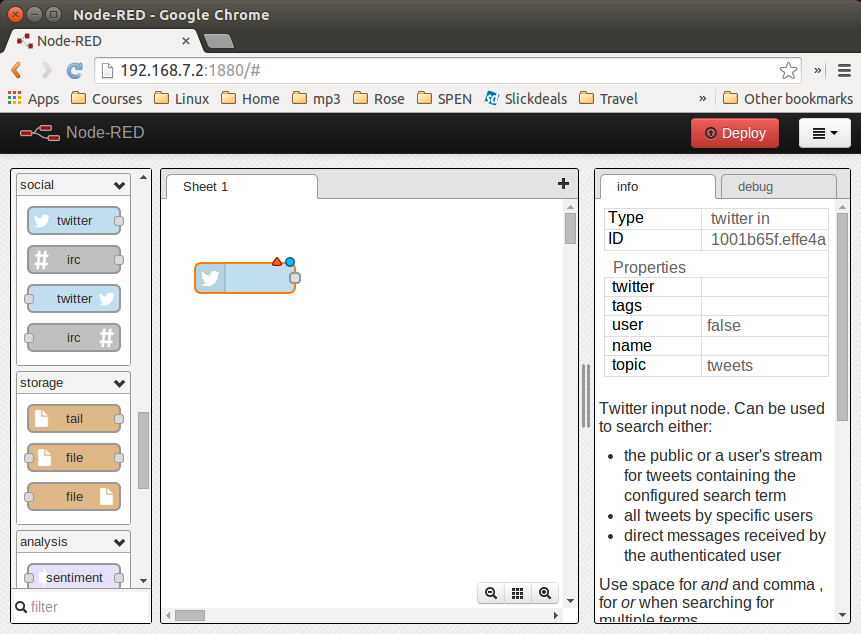
On the Node-RED web page, scroll down until you see the +social+ nodes on the left side of the page.
Drag the +twitter+ node to the canvas, as shown in <networking_node_twitter_fig>.
Node-RED twitter node
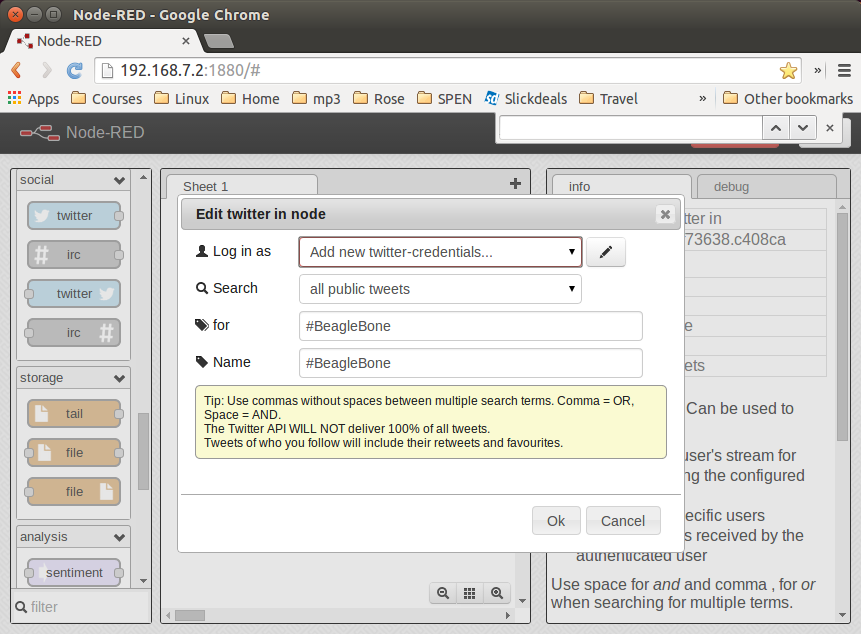
. Authorize Twitter by double-clicking the +twitter+ node. You’ll see the screen shown in <networking_node_twitter_auth_fig>.
Node-RED Twitter authorization, step 1
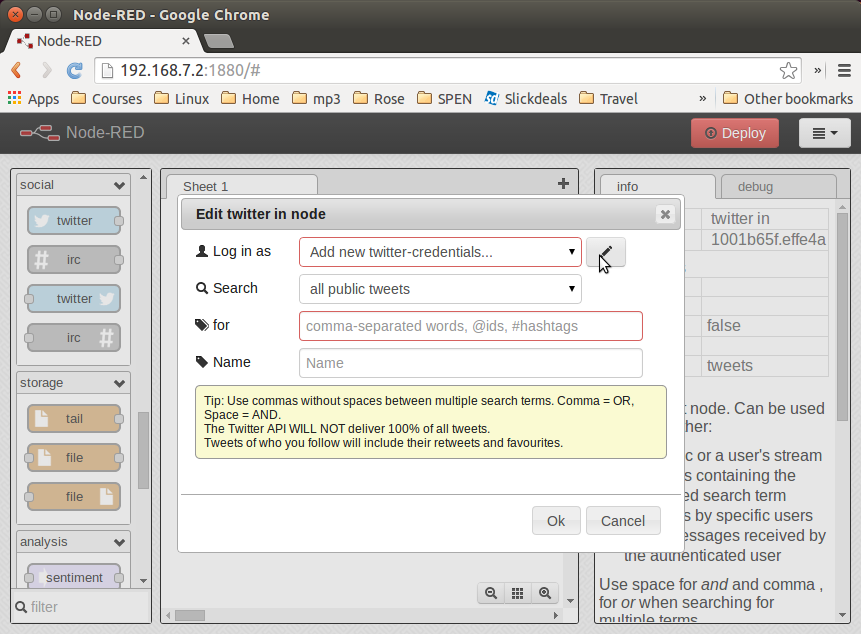
. Click the pencil button to bring up the dialog box shown in <networking_node_twitter_auth2_fig>.
Node-RED twitter authorization, step 2
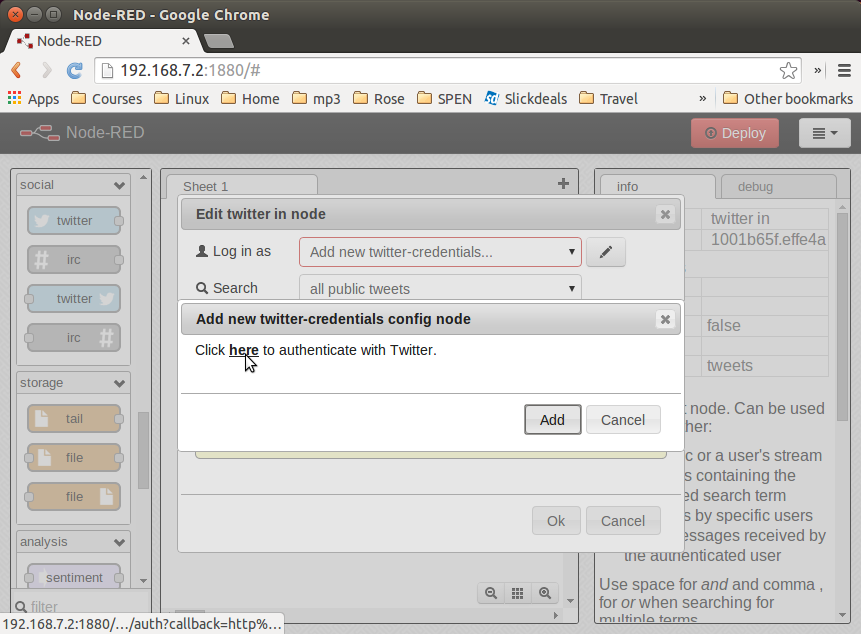
Click the “here” link, as shown in <networking_node_twitter_auth2_fig>, and you’ll
be taken to Twitter to authorize Node-RED.
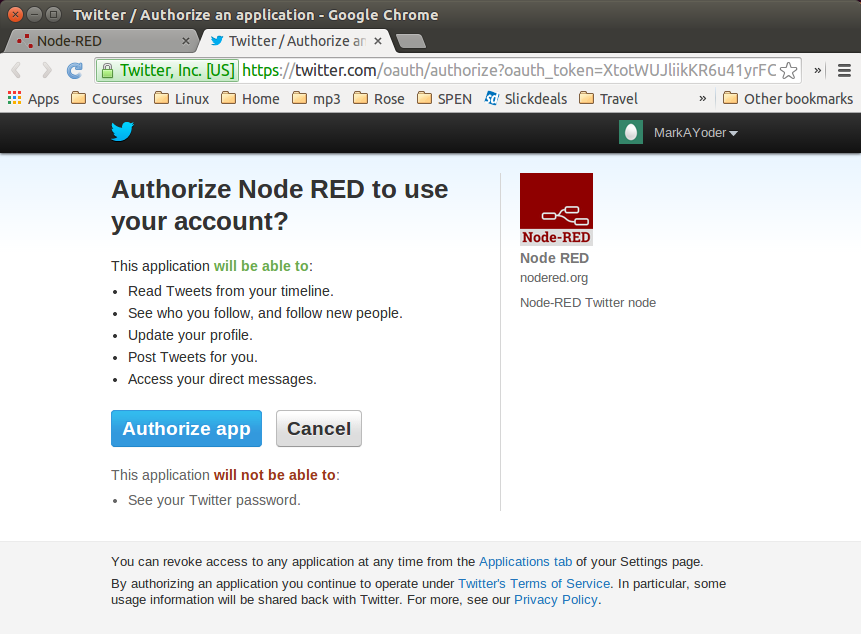
Log in to Twitter and click the “Authorize app” button (<networking_node_twitter_auth3_fig>).
Node-RED Twitter site authorization
When you’re back to Node-RED, click the Add button, add your Twitter credentials,
enter the hashtags to respond to (<networking_node_twitter_beagle_fig>), and then click the Ok pass:[<span class=”keep-together”>button</span>].
Node-RED adding the #BeagleBone hashtag
Go back to the left panel, scroll up to the top, and then drag the +debug+ node to the canva- (+debug+ is in the +output+ section.)
Connect the two nodes by clicking and dragging (<networking_node_twitter_debug_fig>).
Node-RED Twitter adding +debug+ node and connecting
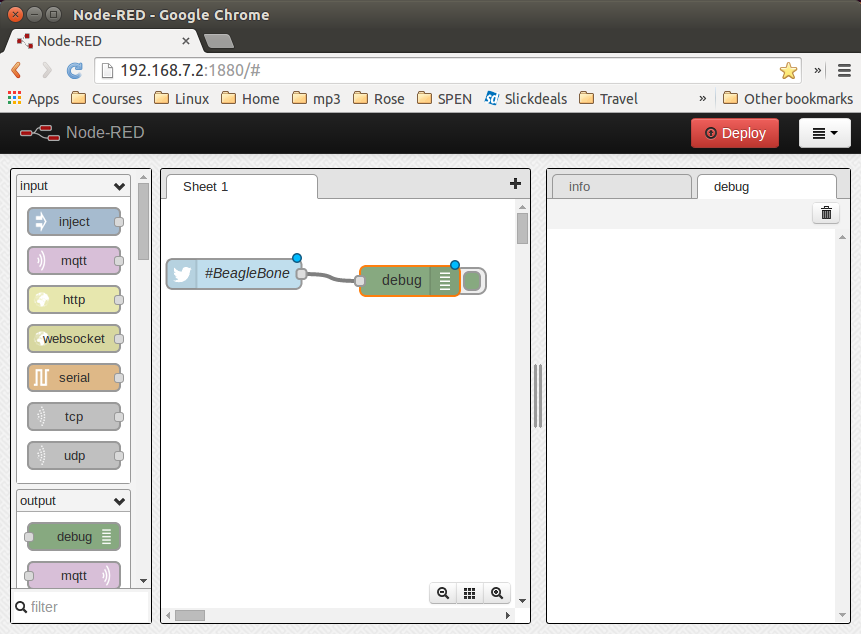
In the right panel, in the upper-right corner, click the “debug” tab.
Finally, click the Deploy button above the “debug” tab.
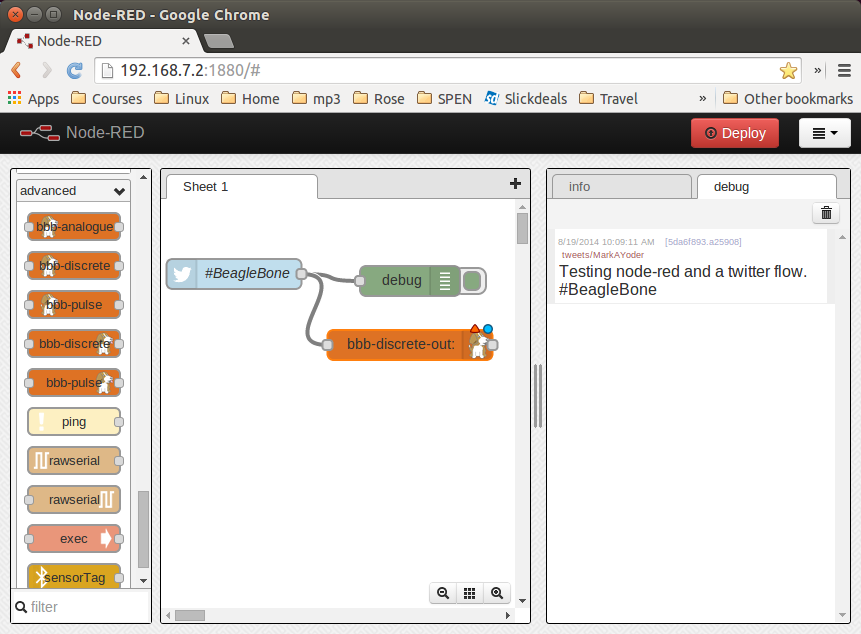
Your Node-RED flow is now running on the Bone. Test it by going to Twitter and tweeting something with the hashtag +#BeagleBone+. Your Bone is now responding to events happening out in the world.
Adding an LED Toggle
Now, we’re ready to add the LED toggle:
Wire up an LED as shown in <displays_externalLED>. Mine is wired to +P9_14+.
Scroll to the bottom of the left panel and drag the +bbb-discrete-out+ node (second from the bottom of the +bbb+ nodes) to the canvas and wire it (<networking_node_bbb_out_fig>).
Node-RED adding bbb-discrete-out node
Double-click the node, select your GPIO pin and “Toggle state,” and then set “Startup as” to +1+ (<networking_node_bbb_out_setup_fig>).
Node-RED adding bbb-discrete-out configuration
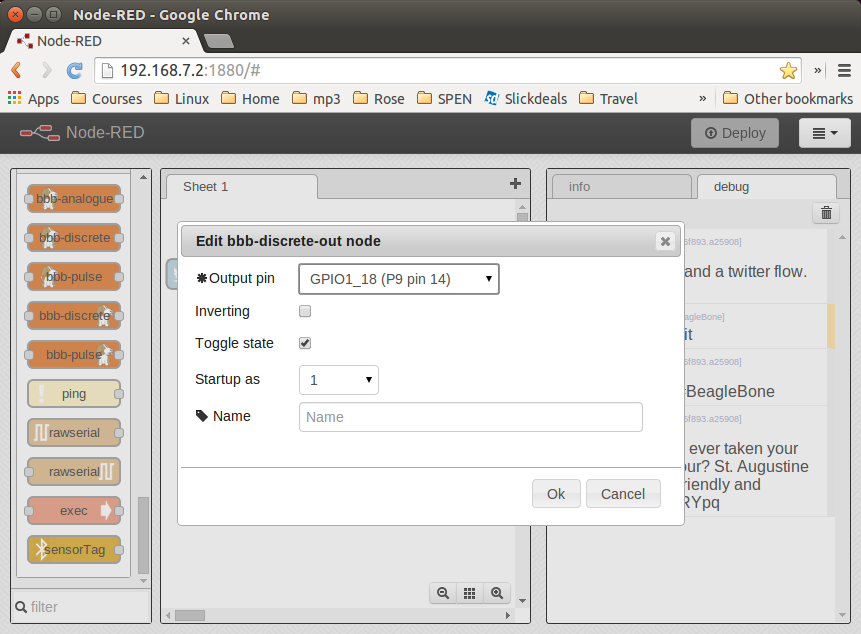
Click Ok and then Deploy.
Test again. The LED will toggle every time the hashtag +#BeagleBone+ is tweeted. With a little more exploring, you should be able to have your Bone ringing a bell or spinning a motor in response to tweets.
Discussion
Communicating over a Serial Connection to an Arduino or LaunchPad
Problem
You would like your Bone to talk to an Arduino or LaunchPad.
Solution
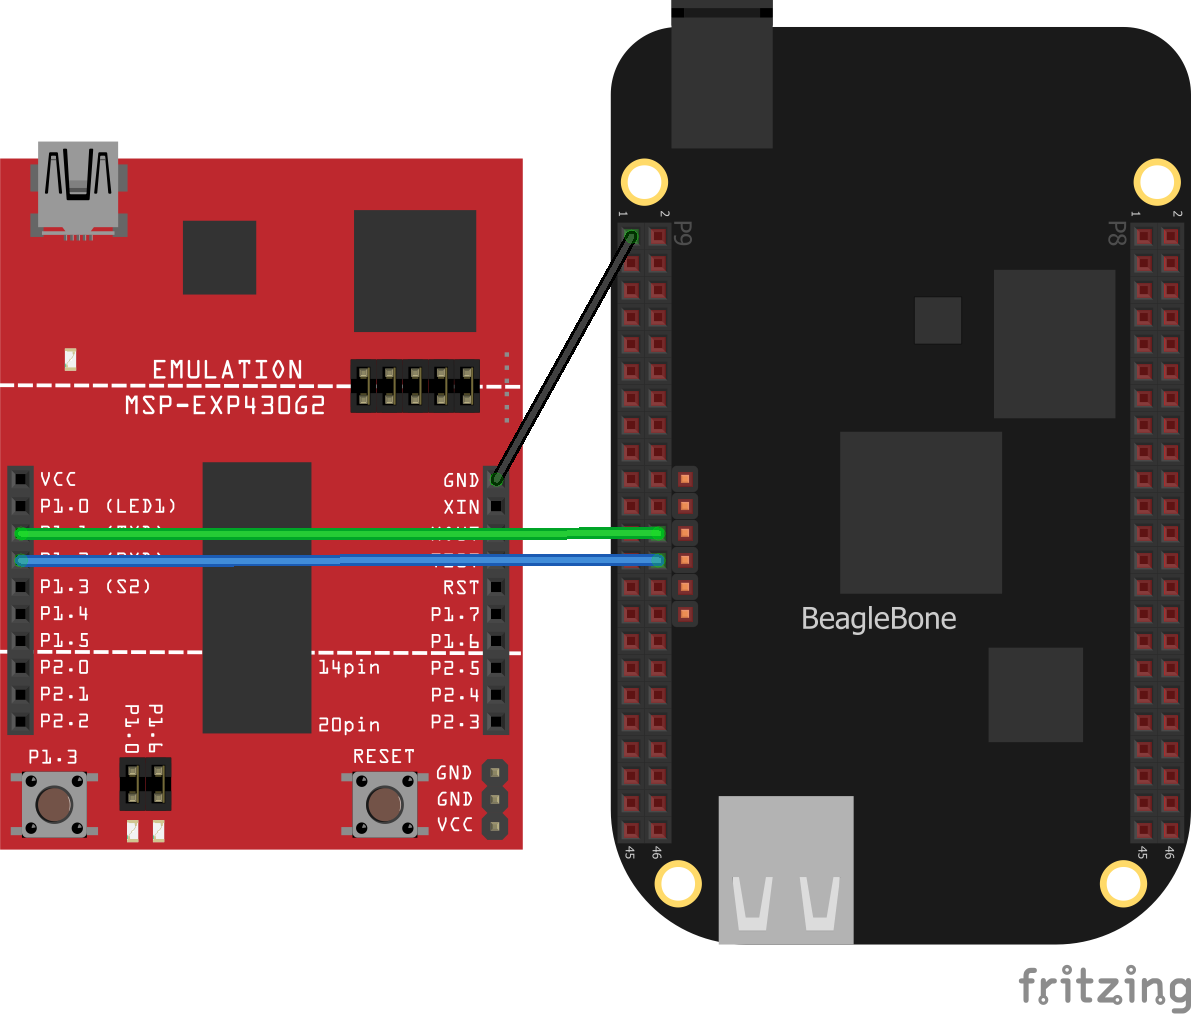
The common serial port (also know as a UART) is the simplest way to talk between the two. Wire it up as shown in <networking_launchPad_fig>.
Warning
BeagleBone Black runs at 3.3 V. When wiring other devices to it, ensure that they are also 3.3 V. The LaunchPad I’m using is 3.3 V, but many Arduinos are 5.0 V and thus won’t work. Or worse, they might damage your Bone.
Wiring a LaunchPad to a Bone via the common serial port
Add the code (or _sketch_, as it’s called in Arduino-speak) in <js_launchPad_code> to a file called _launchPad.ino_ and run it on your LaunchPad.
LaunchPad code for communicating via the UART (launchPad.ino)
include::code/launchPad/launchPad.ino
Set the mode for the built-in red and green LEDs.
Start the serial port at 9600 baud.
Prompt the user, which in this case is the Bone.
Set the LEDs to the current values of the +red+ and +green+ variables.
Wait for characters to arrive on the serial port.
After the characters are received, read it and respond to it.
On the Bone, add the script in <js_launchPadBeagle_code> to a file called _launchPad.js_ and run it.
Code for communicating via the UART (launchPad.js)
include::code/launchPad.js
Select which serial port to use. <networking_cape-headers-serial_fig> shows what’s available. We’ve wired +P9_24+ and +P9_26+, so we are using serial port +/dev/ttyO1+. (Note that’s the letter _O_ and not the number _zero_.)
Set the baudrate to 9600, which matches the setting on the LaunchPad.
Read one line at a time up to the newline character (+n+).
Open the serial port and call +onSerial()+ whenever there is data available.
Determine what event has happened on the serial port and respond to it.
If the serial port has been ++open++ed, start calling +sendCommand()+ every 1000 ms.
These are the two commands to send.
Write the character out to the serial port and to the LaunchPad.
Move to the next command.
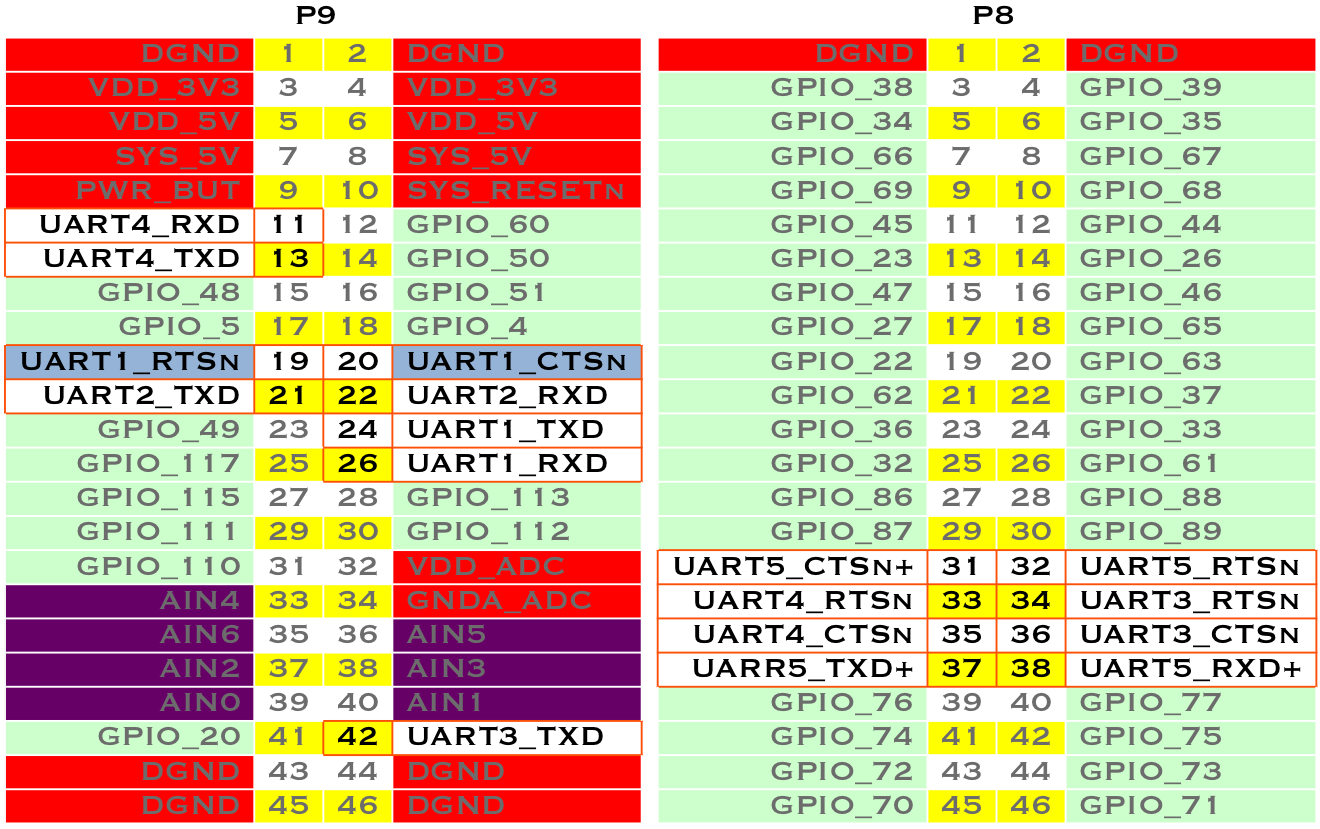
Table of UART outputs
Discussion
When you run the script in <js_launchPadBeagle_code>, the Bone opens up the serial port and every second sends a new command, either +r+ or +g+. The LaunchPad waits for the command and, when it arrives, responds by toggling the corresponding LED.